
1-Step Occupational Therapy Hacks

Photo: Katie Sproul @simplysproul
1-STEP OT HACKS
As pediatric occupational therapists, we are trained to adapt everyday activities in order to facilitate kids’ fine motor development. It becomes somewhat natural to us, and I find myself doing it with my own children without even thinking about it. So today I am sharing 1-step hacks for adapting activities you’re probably already doing with your kids in order to challenge them further. All of the ideas below require only ONE easy change to your activity.
1. Use vertical surfaces
So we all color with our kids, right? While any coloring is good, and beneficial toward working on hand strength and developing a mature writing grasp, take it up a notch. Literally. Have your little ones work on a vertical surface. You could have them color on an easel, or just place a large coloring area up on a wall and let them go for it! I got a roll of this craft paper at the dollar store, and it works great! I can make a really big area, which limits the opportunity for marking on the actual wall.

Photo: Katie Sproul @simplysproul
Supervision is key, and use washable crayons just in case they miss, and you end up with crayon on your walls. And keep Mr. Clean Magic Erasers on hand. But, a little crayon on the walls isn’t a total disaster, is it?

Photo: Katie Sproul @simplysproul
Here’s why vertical surfaces are beneficial:
Improves shoulder strength and stability. OTs always say distal mobility requires proximal stability. And all that means is, that in order for your little ones to properly use their hands and fingers, they first have to develop stability in their shoulders, core, etc. Picture your child as an infant, and how uncoordinated they used to look. When they’re very young, they are unable to stabilize in their core and shoulders, which is why they are less able to use their hands in a more purposeful, coordinated manner. Working on a vertical surface forces them to work against gravity, so they improve their shoulder strength.

Photo: Katie Sproul @simplysproul
Keeps wrist in extension pattern. Some kids flex their wrists when coloring or scribbling, which does not allow for an efficient grasp. Writing, drawing, or coloring on a vertical surface keeps the wrist in extension, which promotes a better hand position for grasping the crayon.

Photo: Katie Sproul @simplysproul
While we’re talking about coloring, that brings me to number 2…
2. Break those crayons!
Yep, I said it. When I was in practice, I was known to break all the crayons. Some people may throw away the broken ones, but OTs cherish them.

Photo: Katie Sproul @simplysproul
Here’s why.
Broken crayons force the child to use his or her fingertips in order to hold it. Some kids gravitate toward using a fisted grasp on a crayon or pencil. But a shortened utensil forces them to move it into their fingertips.

Photo: Katie Sproul @simplysproul
If your little one has a difficult time holding a crayon in a more mature pattern, break the crayon into a smaller piece so they no longer have the room to hold it in their fist.

Photo: Katie Sproul @simplysproul
3. Use sheet protectors
Do you have worksheets that you’ve purchased or made? Put them into a sheet protector and it magically becomes like a white board. You can repurpose the same worksheet over and over again without having to purchase new ones. Ta-da!
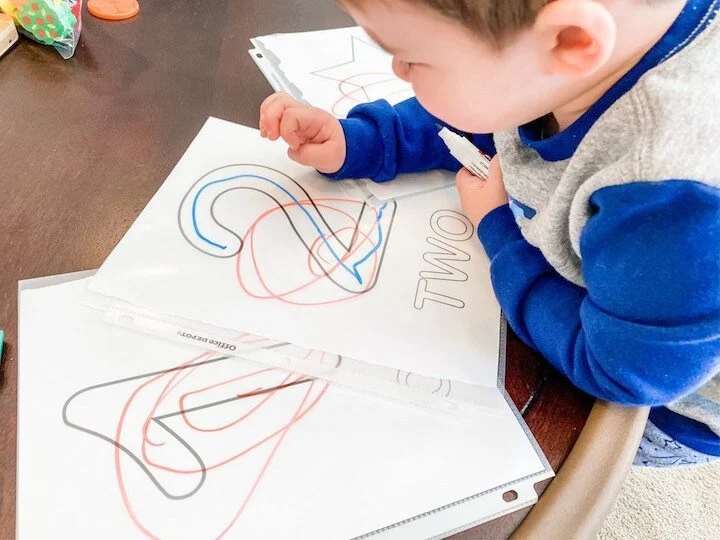
Photo: Katie Sproul @simplysproul
4. Put those toys away!
Here’s what I mean with this one. I use various bags, boxes, containers, etc. for housing our small toys. No, it’s not because I like things picked up and tidy – although that is definitely a benefit. If toys are put into baggies or other containers, you fool your kids into practicing opening them in order to access their toys.

Photo: Katie Sproul @simplysproul
And here’s what you’re facilitating in the process:
Bilateral coordination. Ziplock baggies, Tupperware containers, etc. require the use of both hands. Kids have to use their hands together in order to open and close the bag. And bilateral coordination is SO important for kids to develop. Think about how you would do certain tasks if you couldn’t use both hands together. Getting dressed, tying your shoes, cutting with scissors, twisting open a bottle or jar – these are just a few examples of tasks that require bilateral coordination.

Photo: Katie Sproul @simplysproul
Hand and finger strength. Opening and closing various containers helps to improves your child’s hand and finger strength. Unlike tasks where they can compensate by using larger muscle groups, opening/closing small containers isolates the muscles in their hands and fingers and works to make them stronger.

Photo: Katie Sproul @simplysproul
5. Cutting cardstock
Let your kids play with scissors. Let me say that again. Let your kids play with scissors. With supervision (obviously).
I can’t tell you how many conversations I’ve had with parents who are frustrated that their small child is unable to cut with scissors. I always ask the same question. “Well, do you let them play and experiment with scissors?” And the answer is almost always the same. “NO! I don’t let them use scissors because they could hurt themselves.”

Photo: Katie Sproul @simplysproul
Well, children don’t just wake up one day and know how to do something. They learn by practicing.
Around the age of 3 (sometimes a little earlier, sometimes a little later), kids are usually developmentally ready to start practicing with scissors. Give them a pair of scissors with a blunted end, and a piece of cardstock. Cardstock is thicker than regular paper, which serves two purposes.
It forces them to slow down so they’re less likely to cut themselves.
Because it’s thicker they have to harness more hand strength in order to cut through it.

Photo: Katie Sproul @simplysproul
Let them make snips along the edge of the cardstock to get the hang of it, and then you can progress toward having them cut along a line, cut out a shape, etc.
Now, go get to playing mama! Have fun!
-Katie Sproul @simplysproul